

How to Troubleshoot a Pressure Washer Pump
Table of Contents
- Start With Safety: Release Pressure Before You Touch Anything
- Pressure Washer Pump Not Building Pressure: The Diagnostic Order
- Pressure Washer Pump Pulsing: What Surging Tells You
- Pressure Washer Pump Leaking Water: Tracing the Source
- Troubleshooting by Pump Type: Axial vs. Triplex
- Pressure Washer Pump Maintenance: Prevent the Next Breakdown
- Repair or Replace? A Practical Decision Framework
- Frequently Asked Questions
Last Updated: October 4, 2026
Start With Safety: Release Pressure Before You Touch Anything
A pressure washer pump turns a fast-spinning engine shaft into a powerful stream of water. When it fails, the whole machine goes down.
This guide shows how to troubleshoot a pressure washer pump safely, testing cheap fixes before tearing into the pump.
Before you touch anything:
- Turn the engine switch to OFF and let the machine cool.
- Shut the fuel valve and disconnect the spark plug boot.
- Disconnect the water supply and drain the inlet hose.
Only then should you put a wrench on the pump. Skipping these steps is a common mistake.
Pressure Washer Pump Not Building Pressure: The Diagnostic Order
When a pressure washer pump is not building pressure, work through the system in order: water supply, spray tip, trapped air, unloader valve, then pump internals. Most low-pressure problems come from the first three checks, not a broken pump.
Measure Before You Guess: The Bucket Test and Pressure Gauge
Two cheap tools turn guesswork into a diagnosis: a five-gallon bucket and an inline pressure gauge that threads between the pump outlet and the high-pressure hose.
Bucket test (flow):
- Disconnect the high-pressure hose from the pump outlet.
- Hold the pump outlet over a five-gallon bucket.
- Have a helper start the engine and run it at normal operating speed for exactly one minute.
- Shut down and measure the water collected.
Most gas pressure washers in the 2.5-4.0 GPM class should move roughly 2.5 to 4 gallons per minute at the pump outlet.
Pressure gauge test (pressure):
- Thread the gauge between the pump outlet and the high-pressure hose.
- Start the engine, hold the trigger open, and read the gauge at steady state.
- Compare the reading to the machine's rated PSI.
A reading well below rated PSI with good flow points to the unloader, a worn tip, or internal pump wear.
The Ordered Diagnostic Table
| Order | Check | Time | Test | Most Common Result |
|---|---|---|---|---|
| 1 | Water supply and inlet flow | 5 min | Bucket test at pump outlet | Low flow or clogged filter |
| 2 | Spray tip and nozzle | 3 min | Visual orifice check | Blocked or wrong orifice |
| 3 | Air in the pump and hose | 10 min | Trigger bleed until steady stream | Surging, then steady flow |
| 4 | Unloader valve | 10 min | Gauge reading at steady state | Stuck or worn valve |
| 5 | Pump seals and valves | 30+ min | Gauge + visual inspection | Worn O-rings or valves |
Follow the table top to bottom and you will solve most jobs before step five.
Check Water Supply and Inlet Flow First
Low pressure almost always starts at the water source. A pressure washer pump needs steady, unrestricted flow into the inlet.
Run these checks:
- Confirm the spigot is fully open and the water is on.
- Check the inlet hose for kinks, cracks, or a collapsed liner.
- Pull the inlet filter screen and rinse off debris, grit, or mineral buildup.
A garden hose that is too long or too narrow starves the pump. If the bucket test shows flow at or near rated GPM, the supply is fine, move on.
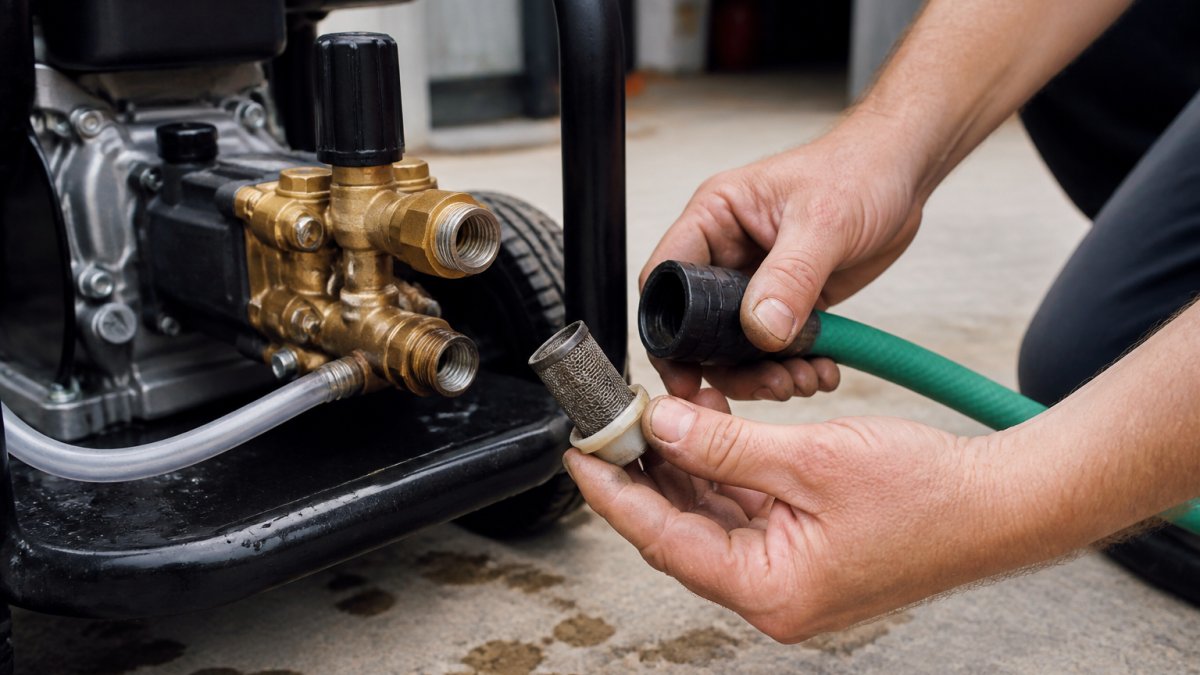
Inspect the Spray Tip and Nozzle for Blockage
A blocked spray tip mimics a failing pump, cutting flow and dropping pressure at the gun even when the pump is healthy.
Twist off the nozzle and look through the orifice. Clear debris with a tip cleaner, not a wire, which can scratch the opening. Check that the tip color matches the job: a larger orifice drops pressure, a smaller one raises it.
Purge Air From the Pump and Inlet Hose
Air trapped in the pump causes low pressure and rough running. To purge it, connect the water supply with the engine off, then hold the trigger until a steady stream flows with no spitting.
If air keeps returning, look for a loose inlet fitting or cracked inlet hose, air gets pulled in through any small gap on the suction side. Tighten every connection and check the inlet O-ring.
Move to the Unloader and Pump Internals Only After Flow and Pressure Are Measured
If the bucket test shows rated flow and the gauge shows low pressure, the unloader is the next suspect.
Only after supply, tip, air, and unloader are ruled out should you pull the pump head to inspect seals, valves, and plungers. That order protects you from rebuilding a healthy pump to fix a clogged inlet screen.
Pressure Washer Pump Pulsing: What Surging Tells You
A pulsing or surging pump usually means air is entering the system, the unloader valve is sticking, or the inlet supply cannot keep up, the pump is losing and regaining prime repeatedly.
Start by purging air again and checking the inlet supply. If surging continues, the unloader valve is the next suspect.
Unloader Valve Inspection and Movement
The unloader valve controls pressure and routes water back to the inlet when you release the trigger. If it sticks, pressure surges or drops.
Remove the valve and check that the piston moves freely. Look for grit, corrosion, or worn seals. A sticking unloader often clears with a cleaning and a new O-ring.
Pump Noises: Knocking, Clunking, and What They Mean
Knocking or clunking from the pump points to a mechanical problem, not a flow problem, often a worn connecting rod, loose piston, or failing valve assembly inside the pump head.
Shut the machine down; continued knocking can turn a small repair into a full pump replacement. Pull the pump head and inspect the valves and pistons for wear, debris, or damage.
Pressure Washer Pump Leaking Water: Tracing the Source
A pressure washer pump leaking water is usually a seal or O-ring problem, and the leak location tells you which one: water at the pump head points to seals, water at a fitting to a loose connection or bad O-ring.
Trace the leak with the machine running and the trigger held open. Watch where the drip starts, not where it lands.
Seals, O-Rings, and the Pump Head
Seals and O-rings keep water inside the pump and oil inside the crankcase. Over time, grit and mineral buildup wear them down, and water finds a path out.
- Water weeping from the pump head: worn piston seals.
- Oil leaking from the crankcase: a bad oil seal.
- Water at a fitting: a cracked or flattened O-ring.
Replace seals and O-rings as a set. Mixing old and new parts is a common reason a leak comes back.
Troubleshooting by Pump Type: Axial vs. Triplex
Axial, triplex, and belt-drive pumps fail in different ways, and the wrong repair path wastes time or destroys a serviceable pump. Before you pull a pump head, identify which type you own.
How to Identify Your Pump Type
- Axial cam pump: Compact, usually bolted directly to the engine with no oil dipstick. Common on homeowner and light-duty machines. The pump body is often cast aluminum with a small brass head.
- Triplex (plunger) pump: Larger, oil-filled crankcase with a dipstick or sight glass, and a bolt-on manifold with three visible plunger ports. Standard on commercial and rental-grade machines.
- Belt-drive pump: Separated from the engine by a belt and pulley, often mounted on a skid or cart. Common on hot-water and high-flow commercial units.
If you cannot find a dipstick or sight glass, assume axial. If you see three plunger ports and an oil fill, assume triplex.
Axial Cam Pumps: What You Can and Cannot Fix
Axial pumps are sealed, non-serviceable units. The swash plate, cam, and bearings are not designed to be rebuilt in the field.
- Low pressure with good supply and clear tip: Usually internal wear on the cam or plungers. Not economically repairable.
- Water in the crankcase or oil weeping from the pump body: Failed seals. On most axial pumps, seal replacement is not supported by the manufacturer.
- Knocking or grinding: Internal bearing failure. Stop running the machine immediately; continued operation can damage the engine coupler.
Axial pumps typically fail from heat and dry-running, not hours alone. On a commercial schedule, expect to replace rather than rebuild.
Triplex Pumps: What Is Worth Rebuilding
Triplex pumps are designed to be serviced. Seals, valves, and plungers are replaceable, and rebuild kits are widely available.
- Low pressure with a healthy supply: Check the inlet and discharge valves first. A single stuck or chipped valve drops pressure noticeably.
- Water weeping from the manifold: Worn plunger seals. Replace all three as a set, not one at a time.
- Oil that looks milky or gray: Water has entered the crankcase through a failed oil seal. Flush the crankcase, replace the oil seal, and refill with the manufacturer-specified oil.
Belt-Drive Pumps: Check the Drive Before the Pump
Belt-drive pumps add a failure point the other two types lack: the belt and pulley system.
- Pump turns but no pressure: Check belt tension and pulley alignment first. A slipping belt mimics a failed pump.
- Squealing under load: Glazed or loose belt. Replace and re-tension per the manufacturer's spec.
- Pump does not turn at all: Seized pump or broken belt. Disconnect the belt and try to turn the pump shaft by hand; if it will not turn, the pump is seized.
Pressure Washer Pump Maintenance: Prevent the Next Breakdown
Regular pressure washer pump maintenance prevents most of the failures in this guide. A few minutes after each job beats a breakdown mid-week.
Build these habits:
- Flush the pump with clean water after every chemical job.
- Check the oil level on triplex pumps before each use.
- Inspect the inlet filter, O-rings, and spray tips weekly.
Winterization and Storage
Water left in a pump freezes and cracks the pump head and seals. Before the first freeze, run the pump dry, pull the inlet hose, and drain every line. Store indoors or add pump antifreeze made for pressure washers.
Repair or Replace? A Practical Decision Framework
Repair the pump when the problem is a seal, O-ring, valve, or unloader. Replace it when the pump head is cracked, the crankcase is scored, or an axial pump has internal wear.
Use this framework:
- Leak or low pressure from a seal or O-ring: repair.
- Surging from a stuck unloader: clean or replace the valve.
- Knocking from internal wear in a triplex: rebuild with a kit if parts are available.
When you are not sure which part you need, that is where we come in. 4J Total Supply carries a deep inventory of pumps, seals, O-rings, unloader valves, spray tips, and hoses for landscaping, agriculture, and pressure washing crews.
Frequently Asked Questions
How can you tell if the pump is bad on a pressure washer?
A failing pressure washer pump usually shows one of four signs: low or no pressure even with a good water supply, pulsing or surging, water leaking from the pump head or under the manifold, or knocking and clunking noises. Before condemning the pump, rule out the cheap fixes first: a clogged inlet filter, a blocked spray tip, air trapped in the inlet hose, or a stuck unloader valve. If pressure stays low after those checks and the pump leaks or knocks, internal wear is likely, and replacement is usually the practical route.
Why does a pressure washer pump pulse or surge?
Pulsing almost always traces back to air or a flow restriction. Air enters through a loose inlet hose connection, a cracked O-ring, or a low water supply, and the pump cannot build steady pressure while it is pulling air. A partially clogged spray tip or inlet filter causes the same surging pattern because flow keeps interrupting. Check the inlet hose fitment and filter first, purge the air by running water through with the spray tip removed, then inspect the unloader valve for free movement.
Why is my pressure washer pump leaking water, and can it be fixed?
Leaks usually come from worn seals, O-rings, or a cracked pump head. Water dripping from the weep hole under the pump often means the seals are worn, while leaks at the manifold point to O-rings or loose fittings. Minor leaks from fittings or O-rings are repairable with a seal kit matched to your pump model. If the pump head itself is cracked or the leak follows heavy knocking, internal damage is likely, and a replacement pump is the more reliable choice.
Can you repair a pressure washer pump, or should you replace it?
It depends on the pump type and the damage. Axial cam pumps are usually replaced rather than rebuilt because seal kits and internal parts are not economical to install. Triplex pumps are built to be serviced: valves, seals, and O-rings can be replaced, and that is often worth doing on a quality pump. If the pump is still under warranty, has a cracked head, or shows a bent connecting rod, replacement makes more sense than a repair.
A pump that quits mid-job costs you a full day of work, and the fix is often a small part you can swap in minutes. The hard part is knowing which part and getting it fast. At 4J Total Supply, we stock high-performance pumps, spray equipment, and replacement components, and our team helps you find the exact fitment for your setup. Check out our pump and parts inventory to get your equipment back on the job.